How To Create A Windows 10 Recovery Drive/Disk

Recovery disk or drive is a portable
windows boot solution program that can repair your computer when your
OS gets corrupted. Like if you had created a recovery drive of your
Windows 10 then you can use that recovery disk at the time when your
windows 10 fails to boot up or any file is missing from your system and
creating an error on your PC. Then the recovery media will be very
useful that will complete up the system files and make your OS as
perfect as new. And this drive can easily be created in your windows as
this is an inbuilt feature. So have a look on complete guide discussed
below to proceed.
Steps To Create Windows Recovery Media Drive/Disk:
Step 1. First of all, you need to have an empty disk or
a USB drive that you want to convert into a recovery drive, insert that
drive in your PC.

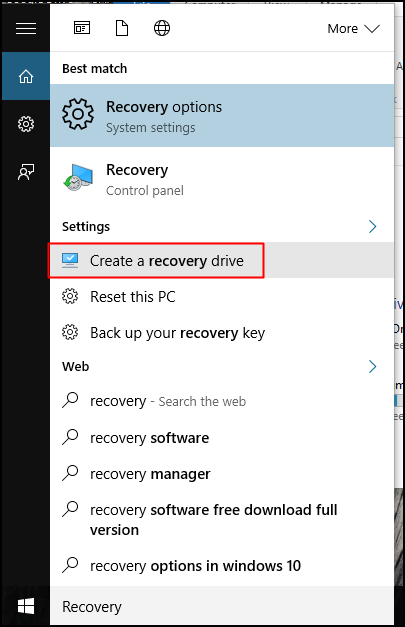
Step 2. Now press windows button of your computer and then type Recovery and then choose the option Create a Recovery Drive.
Step 3. Now just select yes to the admin access popup which appears there.

Step 5. Now on the next step, you will see the drive there that is available for your recovery drive, choose the desired drive there that you want to make the recovery disk.

Step 6. Now the recovery disk process will start and it will take some time and all the recovery files will get written to your drive and this will take time according to your computer speed.

That’s it! you are done, now recovery drive of your windows is ready, now whenever your OS gets corrupted or generate any errors that are due to system halt then you can use this recovery drive to recover all your windows and make it work perfectly.So above is all about How To Create A Windows Recovery Drive/Disk, With this guide you can easily create a recovery drive for the windows that you have currently installed on your computer and use it whenever you have any booting issue or any system file missing errors in your OS. Hope you like this, do share with others too. Leave a comment below if you have any related queries with this.
No comments:
Post a Comment